Page: 1
/ 14
Total 121 questions
Microsoft Dynamics 365 Customer Experience Analyst MB-280 Exam Questions
Question 1
A marketing user wants to target two groups of customers:
1. All customers that live in Paris.
2. All customers that have made more than ten online purchases.
You decide to meet this requirement by making quick segments.
Which two options should you use as the base in the quick segments? Each correct answer presents part of the solution. (Choose two.)
NOTE: Each correct selection is worth one point.
Answer : A, E
* All customers that live in Paris.
Customer profile data has address information.
* All customers that have made more than ten online purchases.
Incorrect:
Not Data tables [Not available for Quick Segments]
Not Enrichments [Not available for Quick Segments]
Note:
Quick segments let you build simple segments with a single operator quickly for faster insights. Quick segments are only supported in environments for individual customers.
Create a new segment with quick segments
1. Go to Insights > Segments.
2. Select New > Create from.
Select the Profiles option to build a segment that is based on the unified customer table.
Select the Measures option to build a segment around measures you have previously created.
Select the Insights option to build a segment around one of the output tables you generated using either the Predictions or Custom Models capabilities.
3. In the New quick segment dialog box, select an attribute from the Field dropdown.
Etc.
https://learn.microsoft.com/en-us/dynamics365/customer-insights/data/enrichment-hub
https://learn.microsoft.com/en-us/dynamics365/customer-insights/data/segment-quick
Question 2
The remote sales workforce of your organization has been using the integrated Teams chat to collaborate internally. To save time, you indicate to the sales leader that suggested contacts can be displayed when a seller starts a new connected chat.
The sales leader asked you to configure the ability to use suggested contacts.
Which three users can you use as a rule for suggesting contacts? Each correct answer presents a complete solution. Choose three.
NOTE: Each correct selection is worth one point.
Answer : A, C, D
Manager on System User Record:
Suggested contacts in Teams can include users directly linked to the individual starting the chat. The manager assigned on the user's system record can be a suggested contact, as this is a common relationship that suggests frequent communication.
Record Owner of the Initiating Record:
The owner of the record being discussed or acted upon is also likely to be a suggested contact. This is because the owner has primary responsibility for the record and would commonly need to be consulted or informed about actions related to it.
Created By of the Initiating Record:
If the user is the Created By for a record, they are associated with its initial setup or creation. As a result, they may be suggested when actions on that record are taken since they are familiar with its origins.
These selections align with the rules typically used for suggesting contacts in integrated Teams chats, ensuring relevant parties are automatically suggested based on record associations and user relationships.
Question 3
Note: This question is part of a series of questions that present the same scenario. Each question in the series contains a unique solution that might meet the stated goals. Some question sets might have more than one correct solution, while others might not have a correct solution.
After you answer a question in this section, you will NOT be able to return to it. As a result, these questions will not appear in the review screen.
A company's IT department has a .CSV file stored on one of their Shared Documents folders within their Microsoft SharePoint sites. The data from the .CSV file is ingested into Dynamics 365 Customer Insights - Data.
The file contains a row header and columns of different types, such as quantities and prices. The file also contains some rows with a high proportion of nulls.
You need to clean and transform the data in Customer Insights - Data to be ready for unification.
Solution: Transform the first row to be used as headers, and remove any special characters or spaces from header row. Remove rows with missing primary keys and name the query. Select Next and your data is now ready for unification.
Does this meet the goal?
Answer : B
Correct:
* Transform the first row to be used as headers. Define column types to be the appropriate field types and name the query. Create a full name and full address columns by merging the appropriate columns if they exist. Select Next and your data is now ready for unification.
The proposed solution effectively prepares the data for unification in Dynamics 365 Customer Insights - Data. Here's how each step contributes to meeting the goal:
Transform the first row to be used as headers: This step is necessary to define the column names, which is critical for accurate data interpretation.
Define column types to be the appropriate field types: Specifying the correct data types for each column ensures that the data will be processed correctly during unification, maintaining data integrity.
Create a full name and full address columns by merging the appropriate columns if they exist: This step enhances the dataset by consolidating relevant information into single columns, which can simplify data usage and improve data quality. Merging columns helps ensure that users can easily access essential information without navigating through multiple fields.
Select Next: This indicates that the data transformation steps are completed and the dataset is ready for the unification process.
Incorrect:
* Define column types to be appropriate field types and name the query. Create a full name and full address columns by merging the appropriate columns, if they exist. Select Next and your data is now ready for unification.
Does not address the problem with null values.
* Remove any rows where the primary key is missing, delete any leading or trailing zeros on the primary key, and name the query. Select Next and your data is now ready for unification.
Problem not related to the primary key.
* Transform the first row to be used as headers, and remove any special characters or spaces from header row. Remove rows with missing primary keys and name the query. Select Next and your data is now ready for unification.
Does not address the problem with null values.
* Transform the first row to be used as headers, define column types to be the appropriate field types and name the query. Select Next and your data is now ready for unification.
Solution removes all rows with null values, which can lead to significant data loss, especially if those rows contain important information.
It may compromise data quality by eliminating rows, which can impact analysis and insights.
* Transform the first row to be used as headers, remove rows that contain null values, and name the query. Select Next and your data is now ready for unification.
While the solution includes transforming the first row to be used as headers and naming the query, the step of removing rows that contain null values is problematic.
Removing all rows with null values can lead to significant data loss, particularly if those rows contain relevant information.
Question 4
A large construction company uses Dynamics 365 Sales to manage their sales pipeline.
All future jobs are logged in the system as opportunities. Depending on the type o( work, some opportunities close faster, and others take longer due to dependency on the third-party vendors.
The sales team does NOT currently use the "On hold* option, as it does NOT provide enough details.
When working with open opportunities, the sales manager wants to know whether opportunities are pending permits or require asbestos removal.
You need to ensure that a salesperson can only select the "Pending Permits" or "Asbestos Removal" option when working with their opportunities to indicate the deal is taking longer.
What should you do?
Answer : A
Understanding the Statuscode and Statecode Columns:
In Dynamics 365 Sales, opportunities have two primary columns related to their status: statecode and statuscode.
The statecode defines the primary state of an opportunity (e.g., Open, Won, Lost).
The statuscode provides more granular reasons associated with each primary state. For example, within the 'Open' state, you can have various reasons such as 'In Progress,' 'On Hold,' etc.
Modifying Status Reasons for Open Opportunities:
The construction company wants to indicate when opportunities are delayed due to specific external factors. To accommodate this, they need specific status reasons like 'Pending Permits' and 'Asbestos Removal.'
By adding these as status reasons under the 'Open' state, you enable sales team members to select these options directly from their current status options.
Steps to Add New Status Reasons to Open Opportunities:
Navigate to Solution: Go to the Dynamics 365 Sales app, then to Settings > Customizations > Customize the System.
Locate the Opportunity Entity: In the default solution, find and expand the 'Entities' list, then select 'Opportunity.'
Edit Statuscode Values: Within the 'Opportunity' entity, select 'Fields,' then find and edit the statuscode field. Here, you can add new options under the 'Open' status. Add 'Pending Permits' and 'Asbestos Removal.'
Publish the Changes: After adding and saving the new status reasons, publish the changes so that they are available to users.
Verifying Custom Status Reason Visibility:
Ensure the new options are available on the Opportunity form for selection.
Test by opening an Opportunity and confirming that the 'Pending Permits' and 'Asbestos Removal' options are available under the Open status reasons.
By following these steps, the sales team can now use specific status reasons to indicate why certain opportunities are delayed, providing clearer visibility into the sales pipeline's status.
Question 5
Note: This question is part of a series of questions that present the same scenario. Each question in the series contains a unique solution. Determine whether the solution meets the stated goals. Some question sets might have more than one correct solution, while others might not have a correct solution.
After you answer a question in this section, you will NOT be able to return to it. As a result, these questions will not appear in the review screen.
You configure forecasts for a clothing manufacturer.
A salesperson updates an opportunity and wants to refresh the forecast
You need to show the salesperson how to refresh the forecast.
Solution: Update the Opportunity Forecast Category Mapping process.
Does this meet the goal?
Answer : B
Correct:
* Recalculate the forecast
Incorrect:
* Recalculate the opportunity.
* Update the Opportunity Forecast Category Mapping process.
Open the Opportunity Forecast Category Mapping Process workflow. You can customize or deactivate the workflow according to your organization's requirements.
Note:
Example of forecast recalculation methods
Let's understand the different methods with an example. Consider a scenario where you have a forecast with 4 quarterly periods and an annual period. Assume that you're currently in Q4. The following table shows when and how the forecast data is updated for different scenarios and periods.
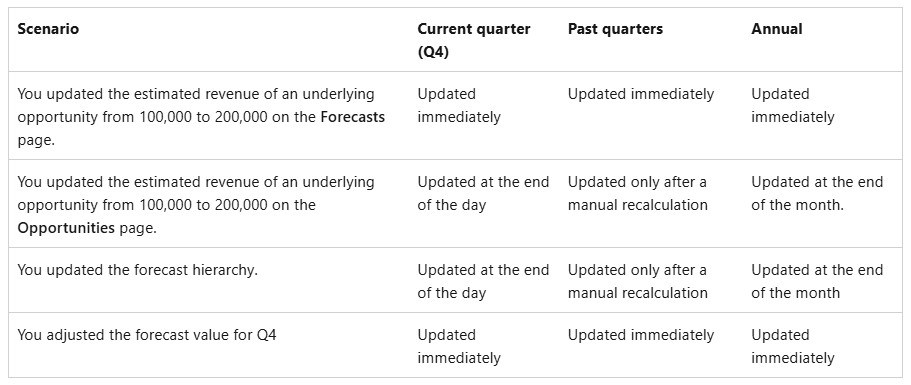
--
Dynamics 365 Sales, Recalculate forecasts manually
You want the forecast data to be up-to-date to make informed decisions. Forecast data is automatically recalculated at regular intervals. However, you can trigger a manual recalculation when you want to recalculate the forecast data immediately. You can also trigger a manual recalculation for past and future periods as they aren't automatically recalculated.
Recalculate and refresh forecast data manually
1. Open the forecast. Verify the Last updated timestamp on the command bar to know when the forecast was last recalculated successfully.
2. Select Recalculate data.
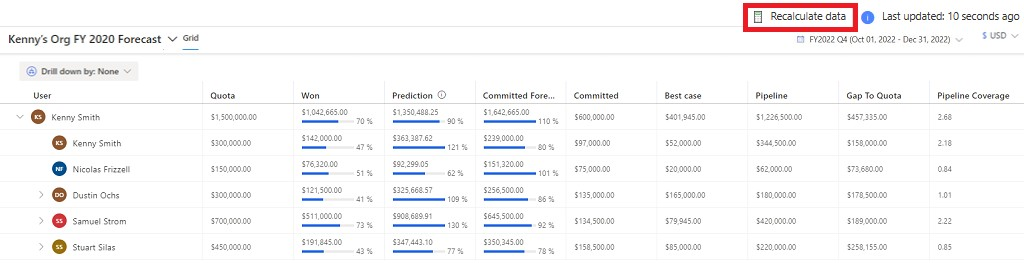
A notification appears at the top of the screen, confirming the recalculation. Recalculation happens in the background, and you can continue to work while recalculation is in progress.
3. After the application recalculates the forecast data, a notification appears to refresh the data. On the notification, select Refresh page.
https://learn.microsoft.com/en-us/dynamics365/sales/keep-forecast-data-up-to-date
https://learn.microsoft.com/en-us/dynamics365/sales/forecast-recalculation-methods
https://learn.microsoft.com/en-us/dynamics365/sales/configure-forecast
Question 6
Note: This question is part of a series of questions that present the same scenario. Each question in the series contains a unique solution that might meet the stated goals. Some question sets might have more than one correct solution, while others might not have a correct solution.
After you answer a question in this section, you will NOT be able to return to it. As a result, these questions will not appear in the review screen,
You recently implemented Dynamics 365 Sales within your organization's sales team. Based on the initial evaluation, adoption is limited as most sales users prefer to work from Microsoft Outlook.
You decide to enable the Dynamics 365 App for Outlook.
You need to perform the various actions required. Each correct action is part of the solution but does NOT solve the problem completely.
Action: From the email settings in the Advanced settings, you migrate email router data from server-side synchronization to Dynamics 365 app for Outlook.
Does this meet the goal?
Answer : A
Correct:
* : From the email settings in the Advanced settings, you migrate email router data from server-side synchronization to Dynamics 365 app for Outlook. [See step 1 below. Use Server-side synchronization]
* You test the email configuration and enable the mailboxes for the Dynamics 365 App for Outlook designated users. [Yes, see step 2 below]
Incorrect:
* Within the system settings and email configuration, you set Process Email Using to Dynamics 365 for Outlook. [No, set this to Server-side synchronization. See step 1 below]
Note:
Deploy and install Dynamics 365 App for Outlook
Step 1: Set the default synchronization method
To use Dynamics 365 App for Outlook, you need to set server-side synchronization for your email processing.
1. From your app, go to Settings > Advanced Settings.
2. Go Settings > Administration and then select System Settings.
3. Select the Email tab, and set Process Email Using to Server-Side Synchronization.
Step 2: Test email configuration and enable mailboxes
Enable and test your user mailboxes so they can use Dynamics 365 App for Outlook.
https://learn.microsoft.com/en-us/dynamics365/outlook-app/deploy-dynamics-365-app-for-outlook
Question 7
You need to update the role configuration for the digital sales team to enable the capability requested. What two actions should you perform? Each correct answer presents part of the solution. Choose two. NOTE: Each correct selection is worth one point.
Answer : B, C
To enable the digital sales team's request to use Copilot for summarizing changes to lead records, you need to ensure that they have the necessary permissions and access to the required features. Here's how to proceed:
Assign the Sales Copilot User Role:
Dynamics 365 Copilot in Sales is a feature that assists users by providing insights and summaries based on data within the system.
To allow the digital sales team to access and utilize Copilot's capabilities, they must have the Sales Copilot user role assigned. This role enables users to interact with Copilot and benefit from its AI-driven functionalities such as summarizing changes and insights in records.
Microsoft Documentation Reference: Dynamics 365 Sales Copilot Setup
Grant View Audit History Permissions:
The View Audit History permission is essential for team members to access audit logs, which is necessary for reviewing and summarizing changes made to lead records.
Enabling this permission will allow the digital sales team to view a history of modifications in lead records, thus allowing them to generate summaries based on this audit trail.
The View Audit Summary permission specifically lets them see summaries of audit data, which complements Copilot's functionality by allowing Copilot to access detailed change history for summarization.
Microsoft Documentation Reference: Security Roles and Privileges
By implementing these two actions, the digital sales team will have both the necessary access to Copilot features and the required permissions to audit lead record changes, enabling them to leverage Copilot for summarizing changes to leads effectively.